Εναλλάκτες (Δυναμό)

Ένας αξιόπιστος εναλλάκτης μπορεί να υποστηρίξει την απόδοση ολόκληρου του ηλεκτρικού συστήματος ενός οχήματος.

Εναλλάκτες (Δυναμό)

Πώς λειτουργούν

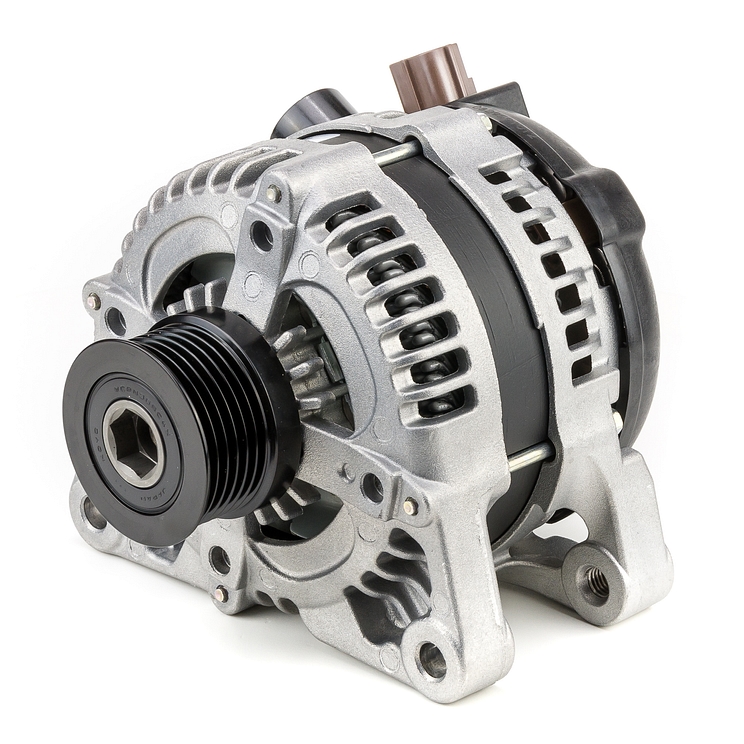
Με κίνηση από τον κινητήρα, ο εναλλάκτης (μαζί με τον ιμάντα και τον ρυθμιστή) μετατρέπει τη μηχανική ισχύ σε ηλεκτρική ενέργεια που τροφοδοτεί διάφορα φορτία στο σύστημα του οχήματος. Σε κανονικές συνθήκες οδήγησης, αυτή η ηλεκτρική ενέργεια θα χρησιμοποιηθεί για την επαναφόρτιση της μπαταρίας του αυτοκινήτου. Όταν το απαιτούμενο ηλεκτρικό φορτίο δεν ταιριάζει με την εξαγόμενη ισχύ που παράγεται από τον εναλλάκτη, η μπαταρία παρέχει οποιαδήποτε επιπλέον ισχύ που απαιτείται στον ηλεκτρικό εξοπλισμό.

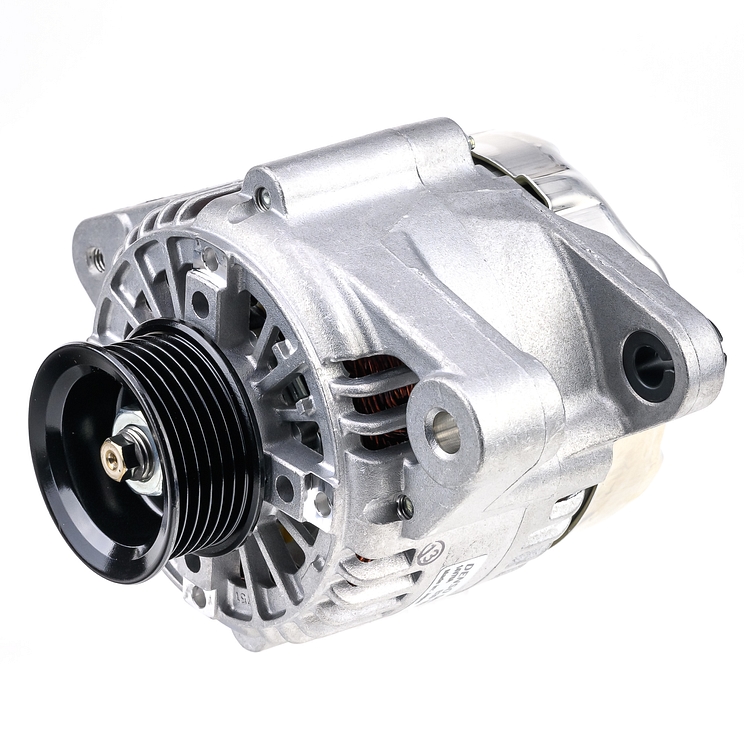
Καθώς οι στροφές του κινητήρα αλλάζουν ανάλογα με τις συνθήκες οδήγησης, αλλάζουν και οι στροφές του εναλλάκτη και η παραγόμενη τάση. Ο ρυθμιστής ελέγχει αυτήν την παραγόμενη τάση και διασφαλίζει ότι τα διάφορα ηλεκτρικά φορτία τροφοδοτούνται με την κατάλληλη τάση, συμπεριλαμβανομένης της μπαταρίας του αυτοκινήτου.

Alternator DAN962 3 D

Χαρακτηριστικά και οφέλη

  • Κατασκευάζεται σύμφωνα με τα πρότυπα ποιότητας premium.
  • Υποβάλλεται σε αυστηρούς ελέγχους για να ανταποκρίνεται στις απαιτήσεις υψηλής απόδοσης.
  • Οι προηγμένες τεχνολογίες επιτρέπουν τη βέλτιστη απόδοση σε όλες τις συνθήκες.
  • Έξυπνη, κατανοητή γκάμα ανταλλακτικών με ισχυρή κάλυψη.
Υψηλή απόδοση
Μικρός και ελαφρύς, ο σχεδιασμός των εναλλακτών της DENSO παρέχει υψηλή απόδοση σε ένα συμπαγές, εύκολο στην τοποθέτηση προϊόν.
Ανώτερη ποιότητα
Ένα προϊόν επιλογής για την Toyota και για μια ευρεία γκάμα ευρωπαϊκών κατασκευαστών αυτοκινήτων, οι εναλλάκτες μας κατασκευάζονται σύμφωνα με τα πρότυπα premium.
Προηγμένες τεχνολογίες
Συμβατοί με εξελιγμένα ηλεκτρονικά συστήματα, οι εναλλάκτες μας είναι κατασκευασμένοι για απόδοση σε όλες τις καιρικές συνθήκες και σε ακραία ηλεκτρικά φορτία.

Τύποι και χαρακτηριστικά

Συνδυάζουμε την εμπειρία μας στη μηχανική με υλικά κορυφαίας ποιότητας προκειμένου να δημιουργήσουμε υψηλής απόδοσης, αξιόπιστους εναλλάκτες στους οποίους μπορείτε να βασιστείτε σε όλα σας τα ταξίδια.

Εναλλάκτες (Δυναμό) Τύποι

Εναλλάκτης με μικρό εσωτερικό ανεμιστήρα

Σχεδιασμένος για να παρέχει βέλτιστη απόδοση σε μικρό, ελαφρύ σχεδιασμό, ο ανεμιστήρας έχει δύο πτερύγια που είναι ενσωματωμένα στον ρότορα, μειώνοντας το βάρος, το μέγεθος και τον θόρυβο του ανεμιστήρα. Επιπλέον, τα βελτιστοποιημένα μεγέθη στάτη και ρότορα μαζί με μικρότερη διάμετρο τροχαλίας βοηθούν στην αύξηση της απόδοσης.

DAN962 3 D
Εναλλάκτες SC

Το 2000, η ​​DENSO εισήγαγε τον πρώτο εναλλάκτη SC (Αγωγός Τομέα) σε παγκόσμιο επίπεδο, χρησιμοποιώντας αγωγό τετράγωνης διατομής (ορθογώνια σύρματα χαλκού) για το πηνίο του στάτη. Ο εναλλάκτης SC μειώνει την αντίσταση του πηνίου και τις θερμικές απώλειες κατά 50 τοις εκατό, όλα σε μικρότερο και πυκνότερο παράγοντα μορφής. Το αποτέλεσμα είναι ένας συμπαγής και ελαφρύς εναλλάκτης με υψηλή αποτελεσματικότητα και απόδοση.

Alternator

Χαρακτηριστικά

Οι προηγμένες τεχνολογίες μας επιτρέπουν τη βέλτιστη απόδοση σε μια μικρή, ελαφριά σχεδίαση. Αυτό επιτρέπει τη μέγιστη απόδοση σε ένα εξάρτημα που τοποθετείται εύκολα και έχει μεγάλη διάρκεια ζωής.

Κατάλογοι και φυλλάδια

Ανακαλύψτε περισσότερα για Εναλλάκτες (Δυναμό) περιηγηθείτε στην ενότητα Περιοχή Λήψεων. Πατήστε εδώ.

Εγκατάσταση και εύρεση σφαλμάτων

Οι βλάβες του εναλλάκτη μπορεί να προκαλέσουν σημαντική ζημιά στα ηλεκτρικά συστήματα ενός οχήματος. Για να αποφευχθεί αυτό, είναι σημαντικό να εγκαταστήσετε σωστά τους εναλλάκτες και να βρείτε και να διορθώσετε γρήγορα τυχόν προβλήματα.

Replacement

Find out how to remove an alternator and install a replacement correctly.
  1. Identify each wire connection and note the location of each on the alternator.

  2. Disconnect the wires from the alternator.

  3. Loosen the alternator pivot bolt but do not remove the bolt yet.

  4. Loosen the tension assembly’s lock nut or bolt and turn the adjustment bolt so that drive belt tension is reduced far enough to allow belt removal. Some vehicles may be equipped with an automatic, spring-loaded tensioner. Rotate the spring-loaded tensioner using the appropriate tool far enough to allow drive belt removal.

  5. Remove the drive belt from the alternator.

  6. Support the alternator and remove the bolts holding the alternator in place. Set the bolts and alternator aside. Be sure to note bracket orientation and fastener length/location before removing the alternator.

  7. Inspect the condition of the wiring and connectors. Inspect for worn wire ends, continuity, loose or broken connectors, corrosion and pliability. Repair or replace as necessary.

Rotating alternator garage
  1. Physically compare the new alternator to the original. Compare the housing and pulley offsets, pulley size and type, pivot and adjustment hole locations, wire connector locations and terminal configurations with the original alternator.

  2. Install the mounting bracket(s) but do not completely tighten the bolts yet.

  3. Support the alternator and fasten it into position but do not completely tighten the bolts yet.

  4. Install the drive belt. If the drive belt is worn, stretched, cracked, oily or glazed, it should be replaced.

  5. Set the belt tension while tightening the mounting and adjusting bolts. Be sure to set the belt tension and torque the mounting bolts to the vehicle manufacturer’s recommended specifications.

  6. CAUTION: Do not pry or hit the alternator housing to adjust the belt tension.

  7. Check the drive belt alignment between the alternator pulley and other drive pulleys. Ensure there is no interference between the drive belt and other components.

  8. Reconnect the wire connector to its proper location on the alternator. Ensure there is no interference between the wire harness and other components.

  9. Reinspect all components. Ensure that threaded fasteners are properly torqued and there is no interference between components.

  10. Reconnect the battery negative cable.

  11. Start the engine. Let it for 5 minutes to accustom the drive belt. Re-adjust the drive belt using the ‘used’ tension specification.

  12. Turn the engine off and re-inspect again.

  13. Re-test the charging system to verify that it is performing according to the vehicle manufacturer’s specifications.

Fault finding

Find and fix alternator faults quickly.
  1. The battery warning light will illuminate on dashboard.

  2. The headlights may flicker or dim.

  3. Electrical accessories will operate slowly or not at all.

  4. The driver will notice stalling and poor running of the engine

  5. The battery drains faster than expected.

  6. The engine will not start or experiences ‘hard cranking’.

  1. The charging system or battery warning lamp is not on with the key switch on and the engine at stop condition.

  2. There is no charge.

  3. There is constant overcharging.

  4. There is intermittent charging.

  5. There is abnormal engine noise.

When solving an alternator problem, it’s important that you identify the specific symptoms of the failure. This will help you to narrow down the possible causes of any alternator failure. Checking the drive belt condition, the cables and wiring, the condition of the alternator itself and the battery during servicing will also help you to identify and solve any potential alternator faults before they become a problem.